
L2 Certification with a Magnetic Apogee Detector at DairyAire 2000
James L. Marino, LUNAR # 793
I have recently been using the magnetic apogee detector designed and described by Robert Galejs in an issue of Sport Rocketry last year. This is a very amazing little device. It uses a chip that can sense it's orientation to the Earth's magnetosphere to fire a low current ejection charge. So far, the unit that I have been using has served me very well, and at last month's DairyAire 2000 launch outside of Fresno, helped me to certify Level 2 with my 3X Cherokee.
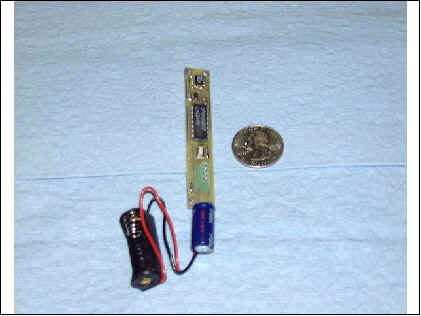
The device assembled is very small, measuring 3" by 1/2" by 1/2", not including the battery, and is lighter than an AA cell. Power for the detector can vary from 6 to 12 volts, most typically the 9v transistor battery may be used. I chose the A23 12 volt battery that I found at Radio Shack. This is a very small battery, about the diameter of a AAA cell, but half as long. Because the detector uses capacitive discharge to fire a low current electric match, this is plenty of power.

Running simulations on my Cherokee showed that a medium delay would be too short, and a long delay too long, so, what to do? The magnetic apogee sensor was the answer. I had used it before in a small C powered rocket, and it seemed to work well. Then I used it to deploy two pounds of candy from my Binder Excel at the February LUNAR launch this year. (My daughter's 9th birthday. Had to do something!) That worked perfectly. Well, no reason not to trust it with my L2 certification.
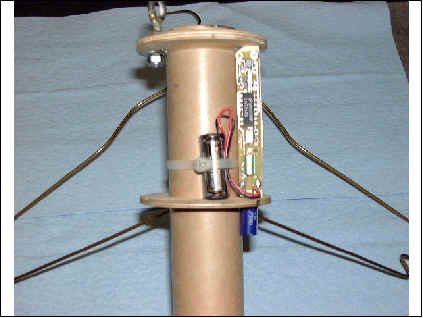
My Cherokee J is based on PML 3.9" Quantum Tube, is 72 inches long, has 3/16" fins, and weighs in at just over seven and one half pounds unloaded. I mounted the tiny apogee detector onto a piece of aluminum sheet metal, and then mounted the assembly into it's bay. The electronics bay that holds the detector consists of a 7" long tubing coupler, two 3.9" by 38mm centering rings, and 7 1/2" of 38mm motor mount tubing. It is mounted inside the airframe just above the motor mount, and held in place by several little removable plastic rivets. The circuit board is mounted so that it will be oriented longitudinally along the axis of the airframe, between the wall of the coupler and the motor tubing, sealing it away from ejection gasses, and the motor mount tubing will serve to duct motor ejection pressure to the recovery system in the event of an electronics failure, and through which to pass the tubular nylon shock cord (which attaches to a u-bolt on the motor mount). Motor ejection back-up, just in case! Outside the upper bulkhead (centering ring) of the electronics bay, I mounted an empty 44 Remington Magnum casing to hold the 1.5 gram ejection charge. The wires for the e-match are routed through a small hole under the casing into the bay, and this is sealed using a small dab of modeling clay. I also mounted a small shorting type audio jack on a piece of 1/8" ply, and epoxied this in place inside the bay, with a hole drilled to access it through he side of the airframe. With the plug in place in the jack, no power is supplied to the circuit, safing it for transport to the RSO table and then out to the pad. Once in place on the launch pad, the plug is pulled, applying power to the detector.

After preparing and installing the ejection squib, I carefully folded the 72" home-made hemispherical parachute, and pushed it into the airframe with the nomex heat shield and the carefully coiled shock cord. I assembled and installed the J350W-L (with guidance from Mr. Bill Townsend, a member of my cert team, Thanks Bill!!), and carried the rocket to the RSO table. Fully loaded, she weighed in at 8 pounds, 12 ounces. With a little help from Hank Ball, I got her into position on pad 11, hooked up the IgniterMan igniter, gave her a kiss, and pulled the plug to power up the detector. My friend Bryan Chuck came over with his camera and took a picture of me with the Cherokee, and we cleared out of the launch pad area. Of course, over the next ten minutes I was plagued with the necessary uncertainty, butterflies, and all else that goes with a certification flight. Then the LCO announced my flight. After calling the attention of the NAR certification team, the LCO gave the short countdown, and up she went! Almost perfectly straight up, and really moving out! At just a bit over 3000 feet, she began to arc over and pop! Ejection exactly at apogee! We watched the 'chute unfurl, and I've been grinning ever since. A perfect, textbook cert flight. I couldn't ask for more. Without the magnetic detector, the flight may have succeeded, but ejection would have occurred much later, at a much higher speed, and would not have been as pretty!
Robert Galejs (galejs@ll.mit.edu) has made his magnetic apogee detector available to the rocketry world in kit form. The kit includes all of the electronic parts, most of which are surface mount, a 9v battery clip, a printed circuit board, and an (I found) easy to follow set of instructions for assembly, calibration, and testing. A lighted magnifier came in handy for assembling the unit, as did a pair of tweezers and a small tipped, low wattage soldering pencil. Assembly, calibration and testing take about 30 minutes. Surface mount components are small and can be difficult to work with, so I do not recommend this as a first project to those without soldering experience. At a cost of $30 per kit, including shipping, this device is something that I won't build another large rocket without! I just bought and assembled two more, for my next projects. If you are looking for something "different" to control your recovery system, give this little jewel a try. Small enough to fly on a "B", reliable enough to trust with a "J". Nice unit, Mr. Galejs, keep up the good work.
There is a write up of the detector, done by it's designer, on the Essence Model Rocketry Reviews site. The URL for direct access to the article is:
http://blackhawk1.raven-villages.net/~EMRR/reviews/scratch/magnetic_sensor.html
I mentioned that this is not a project for those without soldering experience. If there are any MEMBERS of LUNAR that would like to have a detector, and don't feel qualified to assemble it themselves, they can feel free to contact me via this e-mail address or at one of the launches, and I'll be open to discussing the possibility of assembling one for them.
[James Marino can be reached at:
and has a new web site at:
http://www.homestead.com/cherokeej/index.html - ed]