For igniting the Estes-type black powder motors, it is hard to find a better igniter than the one Estes supplies with the motors. There is however a much better means of holding the igniter in the motor than using the Estes-supplied plastic plugs! The plastic plugs are difficult to use correctly. They sometimes do not fit the nozzle properly and fall out. It is easy to short the igniter wires together as the plugs are installed. It is difficult to make sure the pyrogen on the igniter's tip properly contacts the black powder in the motor. As a result, many misfires can be traced to the use of the plastic plugs. The better way to hold the igniter in the nozzle is the way it was done before the plastic plugs were available.
Before Estes supplied the plastic plugs with the motors, Estes recommended and everyone used a small wadded-up ball of recovery wadding pressed into place with a pencil. The ball of wadding should be fairly small and pressed deep behind the igniter with a pencil or other pointed object.

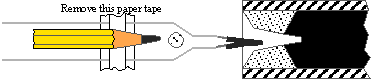
Also, it is much easier to keep the two igniter wires from touching each other and shorting out if the paper tape is removed from igniter before you install it.
|
End View --- Proper Wadding ball Insertion |
||
|
|
|
|
|
WRONG! Igniter leads shorted together |
Correct - Paper tape retained Igniter leads come out on opposite sides of the wadding ball. |
Correct - Paper tape removed Igniter leads come out on opposite sides of the wadding ball. |
It is ecologically beneficial too! Removing the paper tape and not using the plastic plugs has an additional benefit of reducing the amount of trash left out at the pads.
For igniting composite motors, Aerotech Copperhead® igniters are the device many people usually use, but they are less reliable than is desirable and are totally unsuitable for ignition of clusters of motors or ignition of upper-stage motors in multistage rockets. More suitable commercial replacements for the Copperheads are available but are difficult to purchase if you don't have a B.A.T.F. explosives license and an approved magazine to store them in. The options available to the rocketeer are more limited than they were several years ago but there are still some good ones available.
The Copperhead igniters are made from a thin insulating film with thin sheets of copper laminated onto each side. Long narrow strips are sheared off of the sandwich and one end of the strip is dipped into a conductive pyrogen that electrically bridges the insulating sheet between the two foil sides. When a voltage is applied to the two copper foil surfaces, a current flows through the conductive pyrogen and if the current is great enough, causes it to heat up to its ignition temperature.

The failure mode is often introduced into this system when the long narrow strips are sheared off of the sandwich. If the shear that is used to do the cutting is not perfectly sharp along its full length, some of the copper, rather than being cut cleanly will be stretched, pulled and torn down toward the other copper surface causing small short circuits along the edge of the igniter. A good Copperhead requires a one-ampere current to fire it. Depending on their number and size, these short circuits can easily make a bad igniter require 10 or more amps.

There are several companies that sell the necessary supplies so that you can make your own igniters.
Firefox
FireStar Electric Match
Jerry also sells igniter wire assemblies in several sizes consisting of two lead wires with a fine COPEL (copper/nickel) bridge wire element soldered in place. These wires are a bit pricey and Jerry makes several poor excuses for why they are so, but if you don't want to be bothered making your own then these at least appear to be well made. I have also seen one unconfirmed report that FireStar sells COPEL wire in 35/ 38/ 40 gauges if you want to make your own wire assemblies.
Rocketflite
Unrocketry
Trailing Edge Technologies Inc.
There are several ways to fashion bridgewire igniters assuming you have the pyrogen. The method you choose will depend on the size of the nozzle or propellant-grain slot you will be trying to pass the finished igniter through.
Nichrome wire can be used for the bridge wire element but if you are going to solder it you will need to use zinc chloride (Rubyfluid is one brand that works) soldering fluid. The COPEL wire requires a special 2% silver solder (Stay-Brite) if it is to be soldered.
Craft stores carry 32 gauge iron "beading" wire that works well with normal 12-volt launch systems and the iron wire is easy to solder using rosin-core electronic solder.
It is possible to use Estes igniters as a source of a fine bridgewire for making igniters for larger motors.
The tiny Christmas tree lights that come in strings of 60 to 100 are a good source of a bridgewire that works with low-power ignition sources. (These should work great for ejection charges)
Almost all igniter manufacturing starts with twisting wires together. I have found the following wirewrapping technique to be a good means of accomplishing this. The wirewrapping process will go much faster if you make (or possibly buy from RadioShack) a wire wrapping tool. If you make your own it will have two little tubes (each has an ID just large enough to accommodate the stripped end of the wirewrap wire) inside a bigger tube which has an ID just large enough to accommodate the two smaller tubes. Hobby stores sell brass tubing that works well for this.
![]()
You will start with 30-gauge wirewrap wire. Strip 1/2-inch of insulation off of each end of each wire. Next, assuming you have some 30-gauge nichrome wire (which is relatively stiff) wrap the wirewrap wires onto the nichrome wire approximately as shown. Note that it may be easier to handle if you make the first wrap before cutting the 3/8-inch piece of nichrome wire off the roll.
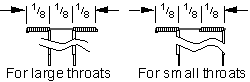
For the large-throated motors, form the wires like this:
![]()
and for the small-throated motors, form the wires like this:
![]()
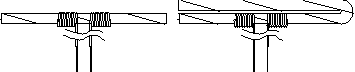
If you are working with a finer gauge nichrome wire or the more flexible COPEL or iron wire then the following arrangement with the bridgewire wrapped over the insulated portion a leadwire makes for a good igniter:
![]()
![]()
After the wires have been twisted together the joints can be soldered to produce a more reliable igniter.
If you have a good digital volt meter (DVM) which can measure low resistances, check the continuity through the igniters. The resistance should be approximately 0.4 to 1.2 ohms.
If the resistance checks out O.K. then the wrapped portions of the igniters can be dipped in the pyrogen and then left to dry. If your nozzle throat will allow it, multiple dips of the Firefox pyrogen may be made to build up the pyrogen on the igniter heads. The Firestar pyrogen expressly warns against multiple dips. Note that a large deposit of pyrogen in the area of the bridge wire will be more difficult for the hot bridge wire to ignite because it will have a higher thermal mass. For quicker ignition using less current, use a relatively thin layer of pyrogen over the nichrome wire and build up to a larger thickness in the area of the twisted 30-gauge wirewrap wires leading away from the head of the igniter. These igniters can be fired from a fresh D-cell and they work very well off a 12-volt battery. With the exception of ones made from the Christmas tree light bulbs, they require too much current to work off of a typical on-board battery or capacitor staging system made for use with flashbulbs or electric matches but will work with systems capable of delivering one or more amps of current for a short period of time.
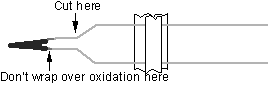
As mentioned before, it is also possible to use Estes Solar Igniters (ESI) to make igniters for large-throated motors. Cut off the ESI’s leads just below the pyrogen (make sure you are also below any oxidation that may be on the wires at this point).
Wrap the wirewrap wires onto the stubs of the ESI. Bend/arrange the wires as shown making sure that the bare wires do not touch. Optionally solder and check for good continuity and no shorts and then proceed to dip it in the pyrogen like the other igniters.
![]()
Firefox also sells small printed circuit chips that consist of a copper "M" trace printed on a very thin fiberglass backing. To use them you are supposed to solder a wire to each leg of the "M" and then dip in pyrogen. Based on tests I have done, these do not work well with the "Electric Squib & Igniter Pyrogen" that I have tried so far. With a large battery (12-volt gel-cell battery) they will blow the pyrogen off without igniting it.
All of these pyrogen mixtures are extremely flammable! The dry pyrogen can be sensitive to shock and friction! Make sure you take all reasonable precautions to protect yourself and to prevent ignition of the mixture. Use only non-sparking materials (copper, brass or wood) to stir the mixture. Be Careful!
Historical Information - Using Thermalite

Flashbulbs work for igniting thermalite (or back-powder ejection charges) because the exterior of the bulb gets quite hot enough to ignite things in contact with it when the bulb is fired. You have to be careful when using flashbulbs because they do not require very much current to fire them. Static electricity can cause them to fire! Unlike LUNAR's flashbulb-safe launch system, the continuity test circuit for many of the common rocket launchers such as Estes, Quest or Aerotech are not flashbulb safe because the test passes more than enough current through the bulb to cause it to fire. The same is also true for the resistance check circuit of most inexpensive Volt-Ohm Meters. Electric matches share this sensitivity to current. Twenty-five milliamps is usually enough to cause a flashbulb or electric match to fire, so to test continuity, you need to use something that operates in the 1-to-5 milliamp range such as a good-quality Digital Volt Meter (DVM) or, as an inexpensive alternative, a piezo-electric buzzer. This sensitivity to current has an upside however. It makes these devices ideal for air starting motors because only small onboard batteries are required to fire them.
Flashbulbs are getting difficult to find because even disposable cameras are coming with electronic flashes these days. Robby’s Rockets is a source for pre-wired flashbulbs or you can try to buy flashbars or flashcubes and disassembling them to get the bulbs. Beware though, not all flashbulbs are made the same way. "Magicube" flashcubes use bulbs that are mechanically fired and therefore have no wires which you can connect to. "FlipFlash" flash bars have wires but require much more voltage than is available in a rocket launcher.
Thermalite is also getting difficult to obtain and the current regulatory environment makes any you do find difficult to purchase without an explosives license. Representatives of the high power rocket community are working with the regulators to try and bring about an easing of the regulations for us. Note that Visco fuse (cannon fuse) is not the same as thermalite and will not provide satisfactory performance if substituted for thermalite.
If you can get (or already have) some thermalite there is an easy way to make reliable first-stage igniters from it without using nearly as much as the flashbulb method uses. You start with a 1-inch (2-inches for BIG, I/J/K/... motors) piece of thermalite from which the fiber sheath and all but one of the spirally-wound wires has been taken off.
![]()
Prepare two 12-inch pieces of 30-gauge wirewrap wire by stripping off 1 inch of insulation from each end of each wire. Take one uninsulated end of one of the wirewrap wires and starting about 3/8-inch in from one end of the thermalite neatly and tightly wrap the thermalite (and it remaining single spirally-wound wire) with the wirewrap wire. Then with the remaining piece of wirewrap wire, starting about 3/32-inch further in on the piece of thermalite from where the previous wrap ended, wrap this piece neatly and tightly around the thermalite.
If you started with a 2-inch piece of thermalite, fold it in half. Finally, you may choose to twist the two pieces of wire together to make a single "cable". This igniter works because the two pieces of wirewrap wire conduct the electricity from the launch controller up to and through the single strand of wire that is spirally wound on the thermalite. This stand of wire has a higher resistance than the copper wire leading up to it and so the small section of it between the two wraps of wirewrap wire will get hot and light the thermalite. While this method will work with wire heavier than 30-gauge, the finer wire is better because it will clear the nozzle better once the motor lights.
Making the wraps neatly can be made significantly easier if you make yourself a wirewrapping tool. The easiest way I’ve found to do this is with three 2-inch pieces of straight brass tubing. One piece is very small and has an ID just large enough to accommodate the stripped end of the wirewrap wire. The second piece has an ID just large enough to accommodate the stripped piece of thermalite. The third piece has an ID just large enough to accommodate the other two pieces of tubing. It should look like this when finished.
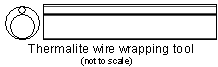
To use it slide the stripped end of the wirewrap wire up into the small tube and slide the larger tube down over the thermalite to the point where you want to make the wrap. Hold the free end of the wire and the thermalite in one hand and spin the tube between the fingers of the other hand. A nearly perfect wrap should result.
Sources of Materials
Jerry Dyben
FireStar Electric Match
P.O. Box 533
New Haven, IN 46774
Fax (219) 749-9840
http://www.ddave.com/firestar/
Email: 104342.3015@compuserve.com
Robby’s Rockets..[Flashbulbs, teflon tubing]
P.O. Box 171
Elkhart, IN 46515
(219) 679-4143
Magnum Rockets Hobbies & More Inc. [Teflon tubing & other rocketry supplies]
P.O. Box 124
Mechanicsburg, Ohio 43044 (513) 834-3306
Firefox Enterprises Inc..[Chemicals, Thermolite, Pyrogen, Nichrome wire, Zinc Chloride]
P.O. Box 5366
Pocatello, Idaho 83202
(208) 237-1976
$2 for catalog & mandatory order form. Must 21 or older.
Trailing Edge Technologies Inc.
http://members.aol.com/jrturner/
"Fire in the Hole" Igniters, Tungsten Igniters
From Robert Briody (TRA #4945) at I'm starting to sell a model rocket igniter system kit. This is a "strip-and-dip" construction system. There are no bridge wires to wind or soldering required. This system will light any motor from 1/2A to >N!! The kit comes in 4 bottles. You supply your own wire. For 1/2A to G motors, use #28 or #30 wire wrap. For H to K motors, use #22 igniter zip cord wire (like DaveyFire or FireStar).For motors with a sufficiently large nozzle, use 3-conductor indoor/outdoor extension cord wire (Home Depot or Orchard Supply). Enough material is provided in the kit to make hundreds of igniters. The cost of the kit is $30 plus shipping. If you'd like more information, please send me an email to
From Greg Dyben at Rocketflite ( For more info send an e-mail message to Rocketflt@aol.com. To receive a free
(The following are potential sources for wirewrap wire, teflon tubing, fiberglass for fins, batteries, switches, lights, piezo-electric buzzers, DVMs and much more)
Haltek [Previously owned electronics]
Excess Solutions [Previously owned electronics]
Fry’s Electronics [Retail electronics]
Bill Cress [All sorts of flashbulbs]
http://home.if.rmci.net/firefox1/
Are you looking for an igniter that can instantly provide 1 second of
temperatures that reach 6,400F to ignite your rocket motor for under $0.60 a
piece? That's right, for under $0.60 a piece! What are you waiting for? Make
only what you will use on site in the State that is hosting the launch and
avoid LEUP requirements.
ML-KIT (50 grams of pyrogen that can make hundreds of igniters) $14.95
ML-16 (1-dozen 16 inch lead wire & soldered element) $6.95
ML-32 (1-dozen 32 inch lead wire & soldered element) $8.95
ML-48 (1-dozen 48 inch lead wire & soldered element) $10.95
ML-64 (1-dozen 64 inch lead wire & soldered element) $12.95
order blank, send me your mailing address. No P.O Boxes please.
HSC Electronic Supply (Halted Specialties Co.) [Previously owned electronics]
3500 Ryder Street 4837 Amber Lane 6819 Redwood Dr
Santa Clara, CA 95051 Sacramento, CA 95841 Cotati, CA 94931
(408) 732-1573 (916) 338-2545 (707) 792-2277
1062 Linda Vista Ave
Mountain View, CA
(415) 969-0510
430 E. Brokaw Road
San Jose, CA
(408) 573-7045
440 Mission Ct.
Fremont, CA
(510) 770-3797
Cress Photo
PO Box 4262
Wayne new Jersey 07474-4262
Tel: 973-694-1280 Fax: 973-694-6965
www.flashbulbs.com


