 LUNAR’clips
2004
Volume 11, Number 5
LUNAR’clips
2004
Volume 11, Number 5
LUNAR’clips
2004
Volume 11, Number 5
Livermore Unit of the National Association of Rocketry September/October 2004
Copyright © 2004 by LUNAR, All rights reserved.
While attending this spring's Dairy Aire launch in Fresno, I accidentally failed to leave my wallet in my truck while I strolled past the "What's Up Hobbies" booth. Bad move. A great big box jumped out at me and attached itself. Turns out, it was a 1/3 scale Nike Smoke kit.
This kit is so simple that I could have bought a pack of epoxy, built and flown it the same day. It comes with everything in the box except the parachute. But, as Lee Teicheira will attest, being an engineer I just had to change something. So, it came home with me in the box.
While I was at Dairy Aire, I got a chance to play with a Black Sky ARRD (Advanced Recovery Release Device). This is a pyrotechnic (or compressed air) based release gizmo that is typically used to do a controlled release of a main parachute. It's a fascinating little device, and I was instantly sold. I absolutely needed one of these.
At home, the box was open before the truck was unpacked. In fact, it was opened, closed, and reopened several times before the truck was unpacked, but that's a different story. As I'm sure most of you all do, I checked out the parts, dry fit everything, and studied it closely. Then I checked out the instructions. But, I kept noticing that there was a lot of room next to the 54mm motor mount. It just didn't look right. After a few minutes and some measurements with a caliper, I determined that two 29mm motor tubes would easily fit beside the 54mm central tube. A plan was taking shape: Air starts!
I had some PML 29mm motor tube laying around, but its outside diameter is not a standard hole saw or Forstner bit diameter. I called around and found an adjustable wood bit that is very similar to a spade bit. It took a few test cuts to get it set right using a piece of hardboard as the test piece. Once correctly adjusted, I marked out two hole centers on one of the two centering rings. Then, using a small piece of 54mm PML phenolic tubing as a joiner, I clamped the two centering rings together and drilled the holes.
The adjustable bit made nice clean holes in the pegboard, but it was not so nice to the birch plywood centering rings. The top one was OK, but the lower one was a little torn up. I should have clamped a backer board to the stack. Still, the holes were well centered and the motor tube fit well. I cut the tubing into two lengths about 13" long and dry fit everything. It all looked pretty good.
To do air starts I would need a way to get igniters from the outboard motors to the electronics that would need to be buried in the airframe somewhere above. I had a piece of 3/8" phenolic tubing that I found some time ago at Halted Electronics (if you've never been to Halted, you're seriously missing out. It's a used and surplus parts warehouse in Sunnyvale www.hsc.com). I drilled a few more holes, this time through all three centering rings, and fed the tube up through. See figure 1 for a detailed look.
I normally draw up everything using a small CAD package I own called DeltaCAD, it helps me think things through a little better and conceptualize the whole thing. Of course, this time I got started too late regarding motor retention. I had picked up a 54mm Slim-line retainer at the Fresno launch and planned to use it well before I thought of adding the additional 29mm motors. But I did the layout for the centering rings before doing the drawing, and I forgot to add enough extra clearance to allow for Slim-lines on those tubes as well. This was a major mistake. By the time I figured it out, the motor tube holes were drilled. I ordered 29mm Slim-lines from Giant Leap, just in case. But when they arrived, they didn't fit. Guess I'll be taping those motors in.
To allow for the 54mm retainer, I had to modify the centering ring locations from that suggested by the instructions. No big deal, but there needs to be extra tubing hanging out to attach the retainer.
I was browsing around looking for a parachute for this thing and remembered that Bob Fortune of Aerocon Systems (www.aeroconsystems.com) had some really cool military flare parachutes for sale at a very reasonable price. I called him up and struck a deal. When I got over to his place to pick it up, I mentioned the ARRD gizmo and how cool it was. He reached into a box and said "Sort of like this?" That feeling came over me again. You know, that "I've gotta have it!" feeling. We worked out another deal that included a 19" drogue, the 66" main, a deployment bag and the ARRD.
On his web site, Bob suggests that the all white parachute could be dyed using Rit clothing dye. I was willing to try, so off to the market I went. The Rit web site had recipes for all sorts of colors, and I had noticed that lime green seemed to work really well out at Fresno against both clear sky and overcast. I needed Kelly Green and yellow to make the dye. Albertson's only had the yellow. I took a short trip to a local yardage store and found that they had the green, but only as a powder. As it turns out, you can mix them; you just need to pre-melt the powder before adding the liquid dye. (This was the result of a very long conversation with a really nice older lady that worked at the store to keep busy!)
I cooked the whole thing up in an enameled corn pot on my trusty Coleman stove. I dyed the drogue first, and it came out really nice, so I stuffed the main into the pot. After about 20 minutes, I pulled it out and rinsed it. It came out great! See figure 2 for a better look.
Figure 2: The main parachute
The shroud lines are made from fiberglass, so they didn't take the dye. It looked like it was sewn from green nylon rather than dyed after-the-fact.
I planned to use electronics to do all the deployments, but I really didn't want to cut the tube in half and do the typical dual deployment method. I wanted to use my ARRD. The plan was to build an electronics bay that slipped down inside the main airframe and was anchored through the wall, but as it turned out, there really wasn't enough room to make it all fit.
I bought some Baltic Birch plywood from Southern Lumber and cut a couple of additional centering rings. I put used a 2 ¼ hole saw (nice tight fit on LOC 54mm motor tubing) to cut the motor mount hole and then split it using a razor saw to make two half circles. To these, I glued and nailed two pieces of that leftover hardboard material. This would allow me to put the bay between the top two centering rings and save the space above it for that 66" 'chute. See figures 3 and 4 for more details.
Figure 3: Electronics bay
Figure 4: Electronics bay attachment
Because the main is rather large, and because I really need it to stay in the main tube until it is actually deployed, I needed a way to eject the drogue that would not effect the main. What I did was to use a piece of 2.1 PML Quantum tube with a coupler and a bulkhead, and attach it to the top of the main 54mm motor mount. This serves as a drogue "cannon" which both isolates the main from the drogue's ejection charge and provides a directed method of forcing the drogue out that doesn't rely on the nose cone to pull it out. Figure 5 shows how all this fits together.
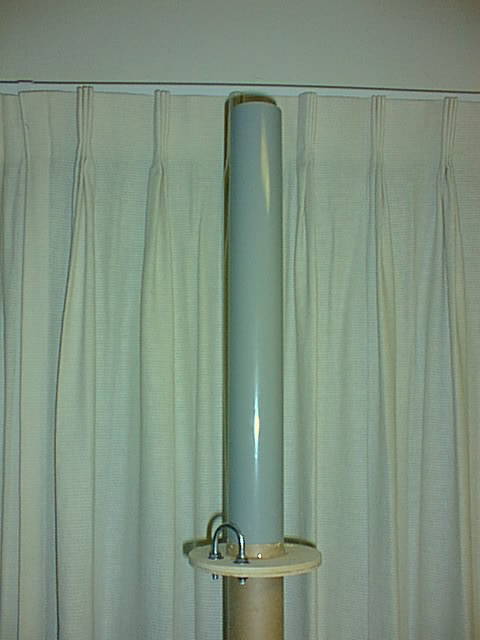
Figure 5: Drogue Cannon
The Skunk Works kit (now Polecat Aerospace) comes with a pre-glassed 5.5" LOC tube for the main airframe. They use a mixture of resin and gel coat that sands really nice. As it comes out of the box, there is a good bit of texture from the glass weave visible. But it smoothed out very nicely using a palm sander and 150 grit sandpaper. I suspended the body tube from a piece of 2x2 across a pair of sawhorses, and applied the sander. It took maybe 15 minutes total to have a perfectly smooth finish with no visible texture.
Next, I had to cut the access door in the body tube. I wanted to use the cut out piece as the hatch, so making as fine a saw kerf as possible is the way to go. Because of the fiber-glassed tube, I didn't want to use a razor blade. That LOC tubing is pretty tough to start with, and with the glass, it would be just a major headache, not to mention a serious carpel tunnel session for my hands.
I chose to use my Dremel tool with a rotary metal saw blade. There were other options, but this was the quickest solution for me. MicroMark (www.micromark.com) sells a miniature jig saw, that they call a gourd saw, which would have worked great (0.026" blade width), but it's $59 plus the A/C transformer (another $40), and for a four sided cut, I just couldn't justify it. Originally, I wanted rounded corners for the hatch, but I settled for square corners and a simple cut.
Back at Halted Electronics, I picked up a handful of Dzus fasteners designed to hold electronics panels in place. At $0.10 a set, I couldn't pass up the deal. Dzus fasteners are quarter turn screws that latch onto a metal clip similar to a tinnerman nut. These would hold the hatch panel in place.
While dry fitting the assembly into the tube, I realized that it was going to be a real bear to disassemble and reassemble the ARRD device way down in the body tube. I did manage to do it once, but I was convinced that would be the last time, so I clearly needed another hatch.
I also need some sort of backup edge to attach the two hatches to. Back at Halted, I found some 0.040" copper clad G-10 like material. It's nice and flexible, so I bought a hunk.
I did some math, figured out the angles, and made a template in DeltaCad. I cut it out of paper and used it to determine the size of copper clad to cut. It was like a window frame. I used a bunch of spring clamps and "C" clamps and held it in place while the epoxy cured. Of course, once I tried to insert the motor tube assembly, it wouldn't pass over the "window". I would have to sand down at least the top centering ring.
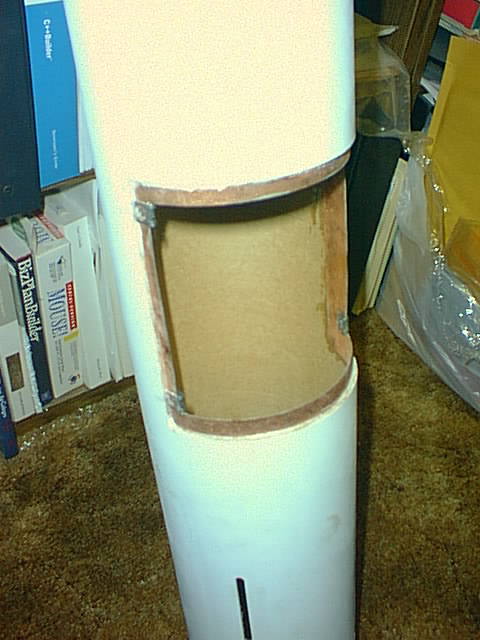
Figure 6: The finished Hatch Window
I had planned to use a homemade PIC ® based timer to do the air starts with. But after a few tests using my own home-brew nichrome wire based igniters, it was clear that it was not up to the job. I made some code changes, added an extra wire to provide independent power to the firing circuit, but it would just not pop a 2½ ohm igniter. Bummer. So, I went back to Aerocon Systems to buy an R-DAS Igniter Board. It has dual outputs, can be set and controlled with the main R-DAS unit, and it looks really cool with its multi-colored ribbon cable.
Here is a picture of everything mounted, but not wired. I still need to determine just how I will arm everything before I can do the wiring.
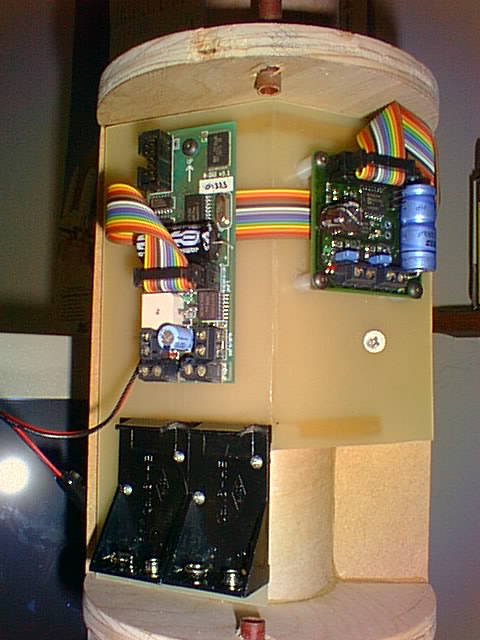
Figure 7: The electronics bay
I needed a secure way to switch power on and off to everything, plus make use of the Arm/Safe feature of the R-DAS. At the July LUNAR club meeting I looked over Joe Heckenbach's Glass Slipper, and he showed me his solution which uses a T-nut, and insulating material, ring lugs and small machine screws. I adopted it. I made two versions, one was a modification of Joe's design, but it really didn't work well, so I then blatantly copied his design directly. I found some 0.200" G-10 material at work, and got the Machine Shop guys to cut a block 0.75"x 1.25". I drilled three holes that were slightly larger than the barrel of the T-nuts through the block. Then, I soldered ring lugs to 3 T-nuts and epoxied them into the block. I then epoxied 3 more ring lugs to the opposite side being very careful not to completely coat the lugs. Once cured, I used a mill file to make sure I had a clean electrical contact surface, and screwed three brass screws into the T-nuts. When tight, the screws touch the front ring lugs and connect through the T-nuts to the rear lugs. I now have three very secure switches that control R-DAS main power, the igniter board auxiliary power and the Safe/Arm feature. See figure 8 for a close-up of the switch assembly before I glued it into place.
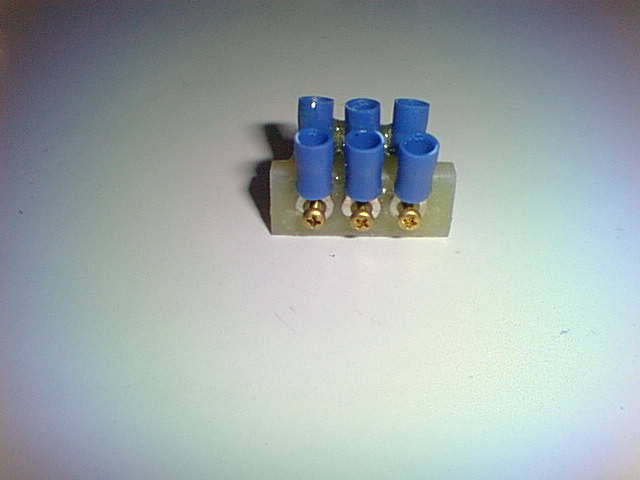
Figure 8: Power control Switch
I wired the switches in. But I decided that simply wiring it in would mean that I would not be able to disconnect things and move them around. I don't yet have an R-DAS for every rocket I own, so ran over to Radio Shack and bought a couple of packs of connectors. I had to hand crimp all the pins because I don't have the correct crimping tool. It took about 2 hours to hand crimp and then solder all the connector pins. Figure 9 shows all of this. In the final version, I have it all tie-wrapped nicely in place with the connectors secured. You can also see in this photo the first version of the power switch assembly (it had red ring lugs).
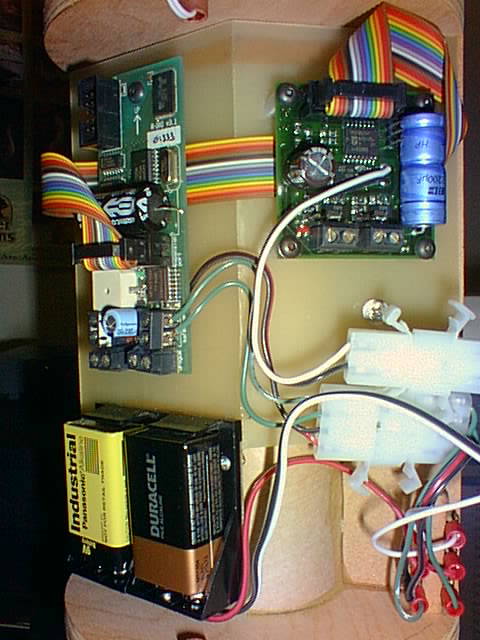
Figure 9: Electronics Wiring
I was ready to glue the motor mount assembly into place in the body tube. With 5 mounting surfaces, this would prove to be a daunting task.
I used sticks to apply the epoxy to the inside of the tube for the upper ring. Then, by rotating the mount such that the electronics bay was facing backwards in the tube I gained access to the middle ring and the bay ring areas through the hatch cutout. After sliding the mount in part way, I also applied glue at the rear of the tube for the lower ring. When nearly into position, I rotated the mount as I slid it into its final location, doing my best to spread the epoxy around well. After it set up, I applied more epoxy to the sides of the electronics bay and as a filet around the top and bottom rings. I feel confident that even with a full on "K" motor, the mount will hold.
Rotating the chassis was no small task, either. I ended up using two 29mm motor casings and a piece of 2"x 2" pine as a spanner wrench to rotate the thing into its final position.
It was now time to deal with the fins. I had to square up the pre-cut fins from Polecat. When inserted into the airframe, they didn't actually touch the central 54mm motor tube. But with a little sanding, everything fit fine, and I started mixing epoxy. I used a good 30 minute epoxy, but it was now approaching 85 degrees in my backyard, and that advertised 10 minute pot life was more like 4 - 5 minutes. But the epoxy ran like 3-in-1 oil, and soaked into the fins really well. I mixed enough each time to glue up one fin and then with the left over I added Cabosil as a thickener and had just enough to do one fillet. I had to work REALLY fast, because once the thickener was mixed in, I had about 45 seconds to do the fillet before it was to stiff to work. Later I went back and filleted the remaining edges. That evening I was able to sand everything down, and then put a glaze of green Squadron Putty on. I really like this stuff because it sets up very quickly then sands almost like chalk. The next afternoon, I sanded everything again to feather it a bit, and then headed over to my brother's house to apply primer.
I used a PPG automotive primer. It mixes 1:1 paint to acetone, and on a hot day like that one, it really works great. I applied two coats, waiting 10 minutes between as suggested by the instructions. It was ready to sand less than an hour after the second coat. I won't have time to do the final color coat before heading off to Aeronaut on July 29th, so it will be flown with just the primer for now. I really want to paint it correctly and apply the lettering, but I still have a lot to do before it's ready to fly!
I really wanted to test the drogue cannon and to try and determine how much BP will be needed to separate the nose cone from the body. So I rigged up a charge using 1.5 grams of 4F BP and set it at the bottom of the cannon. I ran the leads back down the conduit as it would be for real. I hadn't actually secured the upper hatch yet with Dzus fasteners, so I just taped it in place.
I dragged the whole bird out to the front yard and pointed it upwards. I have a tree in my front yard, but the branches are at least 30 feet above the ground, so they wouldn't be a problem. I rigged up a 9V battery, squared everything up, and pushed the button. Ka-Whoomp! The nose cone shot off like a cannon ball, hit the branches and almost got stuck in them! The sound scared the crud out of my wife who was watching TV in the living room with the front window open. It also scared the woman across the street that was watering her yard!
I managed to actually catch the nose cone as it fell from the tree. But that hatch was nowhere to be found! Actually, I did find it: it was about 40 feet away out at the curb. Sure hope those Dzus fasteners hold better than the tape did! I didn't have the drogue 'chute in place nor any of the wadding, but I'm pretty sure none of that will really matter. Plainly, 1.5 grams of BP is more than sufficient to do the job. Once all the laundry is in place, the actual volume will be quite a bit less, so 1.5 grams will clearly be enough, and arguably may be too much.
Figure 10 is a photo of the primed airframe. This is the flight configuration for Aeronaut. You can see the blue masking tape that I used to hold the upper hatch in place with. Four holes later, I had the Dzus fasteners in place and the tape was gone.
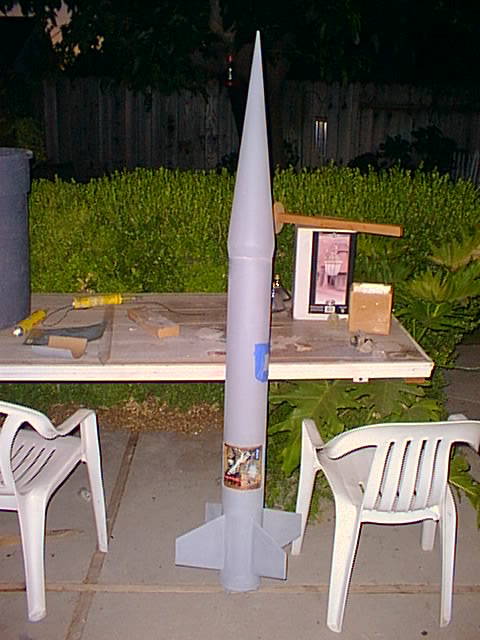
Figure 10: Primed Airframe
The test came on July 31st out at Black Rock, Nevada during the annual Aero-Pac Aeronaut launch. For the first flight I choose to use a 54mm J315 redline motor. This single motor configuration simulated to about 2100 feet. This would be high enough to see it fly and low enough that if the ARRD didn't work, or things got tangled, the damage hopefully wouldn't be too bad.
I carefully packed the parachutes and the drogue cannon, this time using only 1 gram of black powder. The trick seemed to be that I needed to keep a clear pathway open for the drogue to pull the main out after the ARRD released. There was plenty enough room to do this, and I felt confident it would work fine.
I put all new batteries in place, removed the test shunts, and closed her up. She was ready to fly. Out at the pads, I slid the buttons down the rail without any problems, inserted the igniter, and armed the electronics. Because I didn't have any external igniters connected, the R-DAS bleated out the error beep tones the mean that externally configured hardware is not present, but this error code is shared with the "open igniter" condition, and was expected.
Since it was the first flight of this rocket and there was all this uncertainty about the ARRD, the LCO called it a "heads up" flight. The quick count down was called and the button was pushed. The motor lit instantly and it shot off the pad nice and straight. The drogue was deployed just past apogee as expected and inflated perfectly. The original plan was to use a 19" drogue, but at the last minute I swapped it for a 30" PML 'chute. That proved to be a good choice. At between 800 and 900 feet the main deployed and inflated perfectly! The rocket set down about 100 yards from the pad for a picture perfect flight. Cool. It was time to load her up with the full complement.
I had picked up a K1100 Blue Thunder motor and two H268 Redlines to use as the outboards. If I had finished the paint job, the idea was to have Red, White and Blue.
I went through the same loading procedure as the first time, rearming the ARRD, installing the drogue deployment charge with wadding and carefully packing the parachutes. And this time, I added the external igniters for the two H268's.
The rocket weighed quite a bit more this time, over 13 pounds as configured. I loaded it onto the same rail as I had used earlier, installed all the igniters, and armed the electronics. This time, I got happy beeps from the R-DAS since everything it thought should be there, was.
Again it was called as a "Heads up" flight, and this time it proved to be the right call for sure. The count hit 1 and the LCO pushed the button. The K1100 roared to life and this time the Nike Smoke jumped off the pad. It flew straight as an arrow for about 500 feet then something went seriously wrong. There was a loud bang and the rocket did a full cartwheel, and then went into a semi-powered flat spin. It was playing spin the bottle with the crowd, and everyone was scattering like ants at a picnic in the rain. I was freaking out waiting for the two outboard H268's to light and wondering which motor home would end up being its garage.
Ultimately, it fell to the ground about 100 feet from the LCO table, still burning, and then as if with its last dying breath, lit up again and tried to land shark for a foot or two, then flamed out. The LCO was calling out that he thought he'd seen all three motors light, but I never saw any red. I was right. After the range was cleared, I went over and powered down all the electronics, and did a quick inspection. One 29mm motor was missing, and the other looked burnt, but I wasn't sure it had fired.
Back at the bench, a closer inspection revealed the whole story: the nozzle was all but missing from the K1100, and the remaining H268 was unfired. The missing motor was found out past the pad line where it was launched. I'm not sure if it fell out at launch or during the cartwheel. It, too, was unburned. Three fins were torn off and just hanging on by their internal glue fillets. The nose cone was severely damaged with a major hole in it about half way up, and stress cracks in the shoulder and throughout the body of the nose cone.
It just so happened that Gary Rosenfeld of Aerotech was present at the launch. I broke down the motor, and showed it to him, and both he and Karl Bauman of Mojave Desert High Power agreed that it was a motor nozzle failure and that it was a warranted failure. Of course I had barrowed the 54mm 1706 casing from Lee Teicheira, and it was torched along with the rear closure. There is some question about whether Aerotech will warrant the casing since it is clearly more than a year old and did not have a serial number tag present. I'll have to wait and see on this.
In the next article, I suspect I'll be talking about the repair experience for the Nike Smoke. It will be extensive, including a lot of fiberglass work on the nose cone, and bulkhead replacement work (I need to carve out the rear centering ring to inspect the 54mm motor tube where the fins were torn off). I have a digital video taken at the launch of the flight, and if anyone is interested, I can mail it to you upon request. Thanks to Tom Palmer for the video. The image is pretty low resolution, but the audio is really great. You can hear the LCO yelling at everyone to "Leave it alone!! -- Don't touch it!!". Yeah, like anyone would!
All content is the responsibility of LUNAR.
If you have comments or suggestions regarding these web pages,
please contact the 
Copyright © 1992 - 2026 LUNAR