Return to contents.
Load Your Rocket on the Pad
When the safety check and pad assignment are complete check to see if the
high power rack you have been assigned to is open for loading. If it is, go over
and load your rocket. All sizes of launch rods from 1/8
to 1/2 inch are available, and are stored in the white tube in the center of
the pads. We also have two “Black Sky” style launch rails.
All the launch rods and rails are completely interchangeable on all the pads.
Most of the high power launches are from Rack 4 though we may use Rack 3
if the high power waiting line gets longer than the low power.
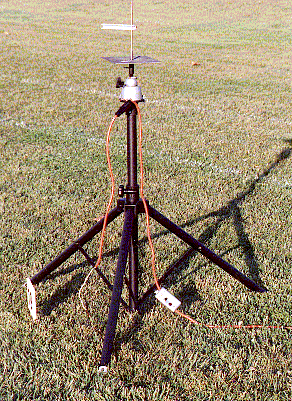
One of the high power pads from Rack 4 is
shown
in the following picture. Note that at the top of the tripod is a Panavice (the
round silver thing). The Panavice is used to set the angle and direction
of the launch rod. It is also used to lower the launch rod down to make it
easier to load your rocket on the pad.
To operate it, loosen the black knob, tilt the launch rod down until it is
horizontal and tighten the knob. Put your rocket on the rod,
tilt it back up, and finish preparing your rocket.
To set the angle and direction, loosen the knob and tilt the rod down about
30 degrees, rotate it to the desired direction, then set the desired angle
and tighten the knob.

One of the Rack 4 high power pads.
Inserted in the Panavice is an adapter that the launch rod fits into and that
holds up the blast deflector. To change the launch rod, loosen the screw in the
adapter and lift it out. Insert a different launch rod, tighten the screw, and
move the standoff from the old rod to the new one. Do not leave launch rods
laying on the ground as they can get stepped on and bent.
The launch clips are on a short piece of cord and are interchangeable with
the cords on all our pads. We have launch clips with two or three alligator clips
or with Aerotech Copperhead clips. Choose the clips that fit your igniter.
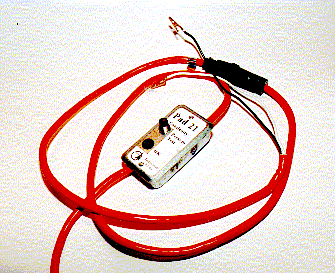
Rack 4 has remote continuity checkers at each of the pads. Pressing the button
tests continuity with a 0.5 ma (flashbulb safe) current. If continuity is good you will hear an audible
beep and the LED lights.

A remote continuity checker on rack 4 with alligator launch clips
attached.
Return to contents.
Launching
When all the pads are loaded, the LCO closes the pads. He then starts charging the
remote launch box. A beeper in the box sounds as it charges (it takes about 30
seconds to charge) as a warning to bystanders. Do not go
near the pads whenever the box is beeping. If all goes well, the LCO launches
your rocket and you get to chase it. If your rocket does not fly for some reason,
the LCO may let you go back and try to fix it. If we are busy, he will give you
back your launch card and ask you
to remove your rocket so that others can launch while you are fixing things.
 LUNAR High-power Field Procedures
 LUNAR High-power Field Procedures